Resistance bands have become a crucial asset for a variety of exercises. However, certain workouts necessitate additional accessories. Resistance band accessories were developed to enhance users’ experience with their bands, enabling a diverse range of exercises by utilizing setups that mimic gym equipment.
The most frequently used accessories for resistance bands are door anchors, handles, and pull-up bars. Conveniently, these accessories are often available for purchase from the same shops where you acquire your resistance bands. This ensures compatibility and makes the overall shopping process more convenient.
Types of Resistance Band Accessories

Resistance bands offer great variety on their own, available in various strengths and types. However, incorporating accessories not only adds variety but also enhances the convenience of your workouts. Here are some exercise band accessories to add extra diversity to your routine.
Door Anchor
A door anchor server is a handy resistance band accessory that enables you to securely attach your bands to a door. This simple add-on provides you with the advantage of diversifying your workout routine by allowing you to perform pulling and pushing exercises from various angles, effectively targeting distinct muscle groups.
Ankle Straps
Ankle straps have loops designed for attaching a resistance band, primarily utilized in lower body exercises like leg lifts and side kicks. Offering stability, these straps enable precise targeting of specific muscle groups, enhancing the effectiveness of your workout.
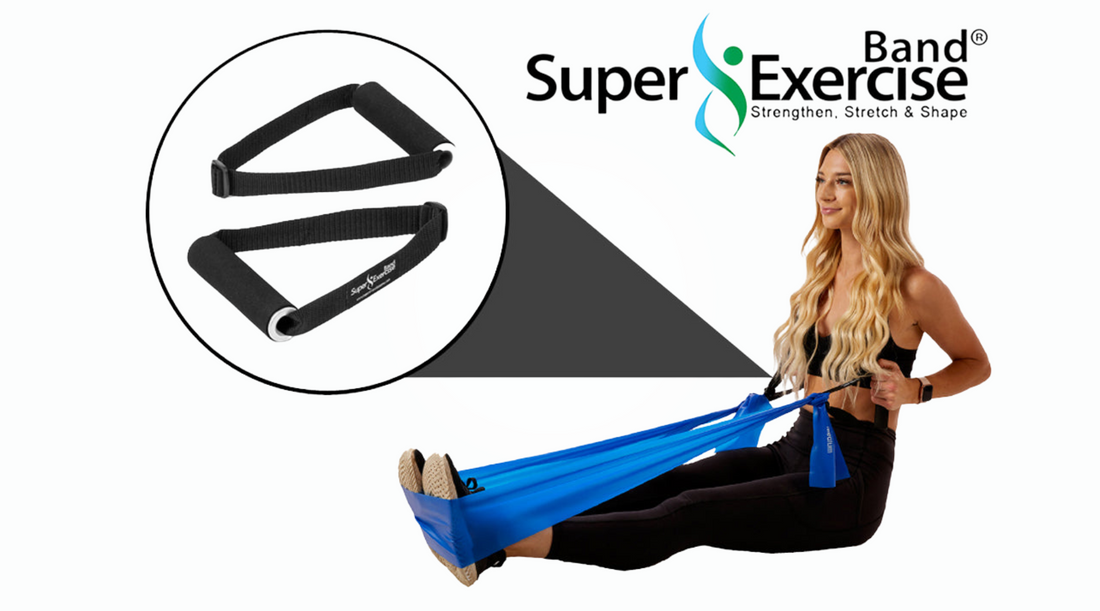
Handles
If your resistance bands did not come with handles, you have the option to acquire separate handles. Handles are designed to provide a comfortable and secure grip, making it easier to execute a variety of exercises. They offer a more natural and comfortable hold, allowing you to focus on the actual exercise without worrying about hand discomfort or slipping.
Carabiners
While certain bands are equipped with built-in clips, some are not. In this case, you may opt for a carabiner. This attachment for resistance bands simplifies the adjustment of resistance levels, enabling effortless transitions between different bands. With carabiners, customizing tension becomes a straightforward task— you can easily attach or detach bands, tailoring your workout intensity to your preferences.
Bar Attachment
This a longer bar that you can attach your bands to, transforming them into makeshift barbells for specific exercises. This wields a dynamic tool that opens a range of exercises, ensuring your routine remains both thrilling and impactful.
Carry Bag
A portable carry case offers a convenient way to transport your resistance bands and accessories, guaranteeing consistency in your workouts. It not only removes the worry of forgetting or misplacing crucial components but also establishes a mobile fitness hub for you on the go.
Resistance Band Set
Instead of individual bands, you can opt for a set that includes various resistance levels, along with accessories like handles and ankle straps.
Types of Resistance Bands That Use Accessories
Though accessories are designed for use with resistance bands, not all bands are compatible with them such as mini loop bands. This is because different types of resistance bands are effective on their own, catering to the specific exercises they are designed for. For a more in-depth understanding here are the most common types of resistance bands that can benefit from accessories.
Tube Bands
While these bands commonly feature handles, they can be combined with door anchors to provide extra possibilities for resistance band workouts.
Loop Bands
Loop bands are already impactful when used independently, however introducing accessories such as ankle straps can unlock fresh possibilities, particularly for lower-body workouts.
Flat Bands
These colored exercise bands are typically recognized for their broad, flat design and can be paired with handles and door anchors to enhance the diversity of available exercises.
Figure-8 Bands
Resembling the shape of the number 8, these bands can be effectively utilized with handles and door anchors to specifically target various muscle groups.
Resistance Band Sets
Comprehensive sets may include a variety of bands and corresponding accessories like door anchors, handles, and ankle straps for a comprehensive workout experience
Exercises with Using Resistance Bands Accessories
This is not medical advice, please consult your doctor before performing any of these exercises.
(Note: This is not a medical advice, please consult your doctor before performing these exercises.)
Door Anchor

Before starting your exercises using a door anchor, make sure that the door is securely closed and the anchor is stable.
Chest Press
- Attach the resistance band to a door anchor at chest height.
- Stand facing away from the door, holding the handles in each hand
- Extend your arms forward, engaging your chest muscles.
Lat Pulldown
- Fix the band to the door anchor above your head.
- Sit or kneel facing the door, holding the handles with your arms extended.
- Pull the handles down towards your chest.
Rowing Exercise
- Secure the band at waist height on the door anchor.
- Stand facing the door, holding the handles.
- Pull the handles towards you, squeezing your shoulder blades together.
Woodchopper
- Attach the band to a door anchor at shoulder height.
- Stand sideways to the door, and grasp the handles with both hands.
- Pull diagonally across your body.
Triceps Extension
- Secure the band at the top of the door.
- Face away from the door and hold the handles with your arms overhead.
- Extend your arms to work your triceps.
Handles

When using handles, remember to maintain proper form and control throughout each exercise to maximize the effectiveness and reduce the risk of injury.
Bicep Curl
- Stand on the center of the resistance band and hold the handles with palms facing forward.
- Keep your elbow close to your body and curl the handles towards your shoulders.
Shoulder Press
- Stand on the band, holding the handles at shoulder height.
- Extend your arms overhead, fully engaging your shoulder muscles.
Lateral Raise
- Stand on the band and grip the handles with arms at your sides.
- Lift the handles out to the sides, keeping your arms straight to work on your lateral deltoids.
Tricep Kickback
- Anchor the band at a low point, or step on one end.
- Hold the handles with your arms bent at 90 degrees, then straighten your arms behind you, engaging with the triceps.
Chest Fly
- Secure the band at chest height.
- Stand facing away from the anchor, hold handles, and extend your arms to the side, targeting the chest muscles.
Ankle Straps
Before starting resistance band exercise with ankle straps, ensure that they are securely fastened, and maintain control throughout each exercise to maximize effectiveness and minimize the risk of injury
Leg Press
- Attach the ankle strap away to your ankle and secure the band to a low anchor point.
- Stand facing away from the anchor and curl your leg straight back, engaging your glutes and hamstrings.
Standing Leg Curl
- Secure the band at a low point and attach the ankle strap to your ankle.
- Stand facing the anchor and curl your leg up towards your glutes, targeting the hamstrings.
Hip Abduction
- Fasten the ankle strap around your ankle and attach the band to a low anchor point.
- Stand sideways to the anchor and lift your leg out to the side, targeting the other thigh.
Kickbacks
- Secure the band at a low point and attach the ankle strap.
- Face the anchor, and kick your leg straight back, engaging the glutes and hamstrings.
Inner Thigh Lift
- Attach the ankle strap and secure the band to a low anchor point.
- Stand sideways to the anchor and lift your leg towards the opposite side, targeting the inner thigh.
These fundamental exercises can be integrated into your routine depending on the accessories at your disposal. Combining accessories may also be done to optimize the efficiency of your workouts and make the most of your resistance bands. Consulting with an expert can further assist you in tailoring exercises that suit your body, considering the specific resistance bands and accessories you have. Take note that the selection of accessories is influenced by your preferred exercises and the type of resistance bands you own.
Compatible Resistance Bands and Accessories

The key to a successful workout routine using exercise bands lies in the compatibility between your resistance bands and accessories. This compatibility allows you to maximize the range of exercises, promoting versatility in your regimen. Compatibility also ensures safety by ensuring that the accessories are securely attached to the bands, reducing the risk of accidents or equipment malfunction during workouts. Ultimately, the harmony between resistance bands and accessories enhances the efficiency and enjoyment of your fitness routine.
To guarantee compatibility, it is best to purchase your brands and accessories from a single source such as Super Exercise Bands. As an online resistance bands shop, Super Exercise Bands offers both resistance bands and accessories, ensuring that the accessories are tailored to their bands. They also provide resistance band sets eliminating the need to buy separate color-coded bands and accessories. You may also buy in bulk and rolls to save time and money.
Effective workouts with well-matched set-ups using Super Exercise Bands, home of high-quality and heavy-duty resistance bands. Shop now and gear up for the ultimate workout experience.
The content provided on this blog is for informational purposes only and is not intended as professional medical advice. The information shared here should not be used to diagnose or treat any health problems or illnesses without consulting a qualified healthcare
professional. Always seek the advice of your physician or other qualified healthcare provider with any questions you may have regarding a medical condition. Never disregard professional medical advice or delay in seeking it because of something you have read on this blog. Reliance on any information provided by this blog is solely at your own risk.